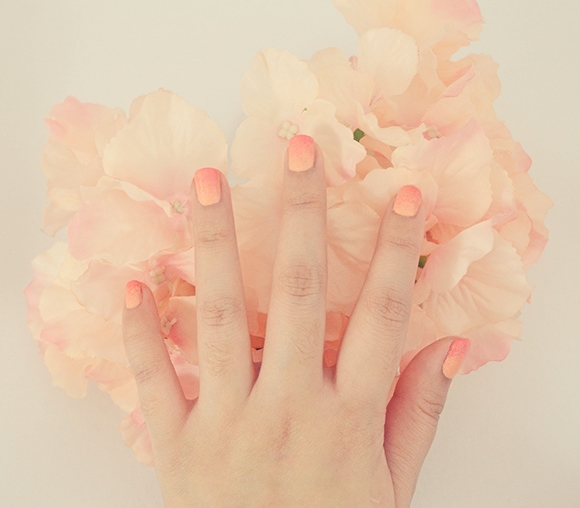
DIY : Gradient Ombre Nail Art ♥
I feel like I’ve been gone from blogging for a very long time. I missed hearing from all of you, reading your blogs, and writing my own posts. Yesterday I did a little reading and found out that I won Shari, The Misty Mom‘s first giveaway. Hooray! ♥ I feel very blessed and lucky to have won her giveaway because I am a big fan of The Misty Mom even before I started my own blog, and back then I only knew a handful of blogs so it was very special for me :)
Today I decided to try nail art that seemed intimidating to me at first but turned out to be fun and easy. It’s a DIY gradient / ombre nail art. You can find a lot of these tutorials online, but I wanted to take you with me as I attempted to venture into it for the first time. I also hope that you find this helpful and perhaps encourage you to try it as well if you haven’t :)
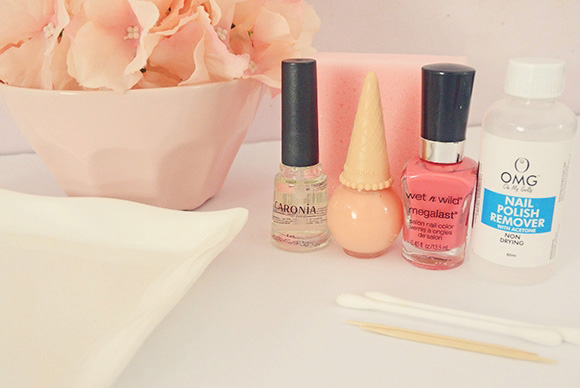
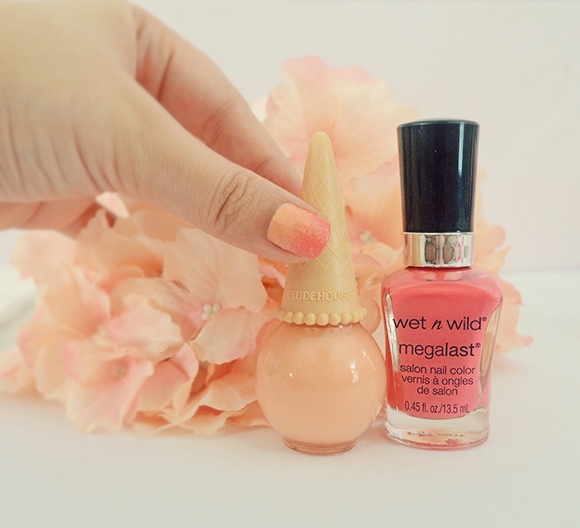
MATERIALS. You are going to need two colors of nail polish (I used Etude House Ice Cream Nail Polish #36 and Wet n Wild Megalast Nail Polish in Tropicalia), a top coat (I used Caronia Clear Nail Polish), nail polish remover & cotton buds to clean up your nails after because they will get messy, a plate, a sponge (I got this from the supermarket), and some toothpicks.
1. Paint your nails with the lighter color of nail polish and wait for it to dry.
2. Cut up your sponge into little pieces for an easier grip & so you can use the other parts for other nail art.
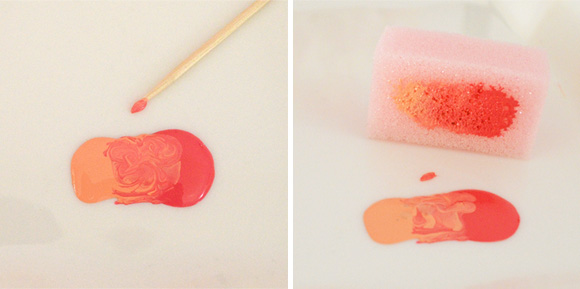
3. Pour a generous amount of nail polish onto your plate. Make sure that both colors are almost touching each other.
4.Use a toothpick to mix those two colors of nail polish in the middle where they meet. This area will determine the length of the gradient on your nails. You can adjust the size of the mixture depending on how big you want your gradient to be.
5. Use a portion of your sponge and dab it on the mixture. You can dab this sponge on a piece of tissue if you got too much nail polish on it just to remove the excess.
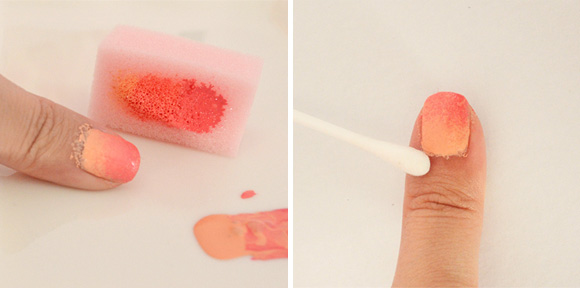
6. Dab the sponge with the nail polish mixture on your nails. Keep dabbing until you get the result that you want.
7. Clean up time. If by this time your nails are all awfully messy, then you are doing a good job. Use your acetone and cotton buds to clean up the excess nail polish on your fingers
8. When its dry paint a top coat over it and let it dry.
Tada! Very easy and I must say really fun to do. Also I’d like to point out that the the nail polish colors are brighter in real life and looked subtle on these pictures because of the lighting. Hope you like it! ♥
Pictures by Shayne Naidas



128 Comments
Wow. Congratulations your winning.. and that polish is cute.how i wish I can learn that too.
It looks good! Parang pro but the only reason why I don't this kasi parang rough siya sa last. Hindi ba? Let me know then I guess I'll try it soon! By the way congrats on winning! Hindi ko na na vivisit ung blog nia hehe
really cool post! I´ll try it! thx for your explanation how it works.
Keep in touch
Anni
Fashion Hamburg Blog
Fashion Hamburg Facebook
Super cute!!
http://steph-g.blogspot.com/
They are amazing, well done! xo
Love the choice in colours you went for :)
I really like the ombre nail art
chanelle jade xx || http://www.chanellejade.blogspot.com
OMG! I have always wanted to try doing ombre nails, but I always fail. The colors are very refreshing and so ladylike. <3
You ate very talented kiddo I love the colors great job.
http://tifi11.blogspot.com
Love it and they look super awesome. So easy, I'm definitely going to try this. Love Étude House nail polishes, I feel like eating them.
Good to gve you back
Naaj x
http://naajronaslifestyle.blogspot.co.uk
Hi sweety, love how you created this pretty nail art, the colors are sublime! Happy September Doll!
good job, Shayne!
Love it! Very nice color combo, and the texture looks cool.
What an amaaazing tutorial You made it look so easy! haha
great step-by-step pictures and a beautiful result :D
The Blushing Giraffe | A New UK Beauty Blog
xxx
That's such a great tutorial! I have neverunderstood how to do this, but now I get it! Your polish looks amazing, I love the colors you chose! That first picture deserves to be on nail art pinterest boards everywhere, haha! Lovely nail look, and thanks for sharing it! I'll have to try it sometime!
Francesca
Awesome tutorial and photos! Did you have a hard time removing the excess polish? That part actually took me a longer time than doing the actual gradient.
Wow it looks soo fresh♥
I love the combination it somewhat reminds me of melons :D
Loving it!♥
Wow this looks fun and exciting! I want to try that too!!
http://love-your-ego.blogspot.de
Loving your nail art. You make it look so easy and neat. I have zero art skills.
Great tutorial and this is perfect for a lovely romantic wedding :D Great pictures :-)
Cute ng mga post mu sa mga nail polish. sayo ko kumukuha ideas hahaha! :)
xoxo,
SHERLAINE
.never settle for less.
The colors are vibrant! Really looks cute. I have never worn nailpolish my entire life so I'm just really fascinated by the colors that fit the person who uses it, hehe :)
That looks so good :) I definitely want to try this!
Meg xx
peachpips.blogspot.com
Very nice idea! Thx to share it dear ;)
Wow! I love that you chose soft colors. Great DIY.
http://www.vworldrocks.blogspot.com
I am going to try this, it looks lovely..
I am hosting my first ever giveaway, you can win $30 clothes, would love if you can enter
http://www.beingbeautifulandpretty.com/2013/08/my-bday-ahai-shopping-giveaway.html
Keep in touch,
http://www.beingbeautifulandpretty.com
http://instagram.com/beingbeautifulpooja
Pretty! I'll have to try this out!
What camera do you use? I love the quality!
Congrats on winning the giveaway! (Huzzah, free stuff! ._.')
Oooh, that Wet N Wild polish colour is gorgeous! Love the colours you used and how i turned out! Very fruity(?)/sunset-y(?) imo, heh
Vanessa | Citron and Guavaberry ʘ‿ʘ | Makeup & Silly things
Pretty! I love the colours you used <3
Pretty! I've got to try ombre nails some time! Looks very simple to do too! Thanks for sharing!
Wow sweetie many thanks for this tutorial, is really easy and cute. Just I need use two cute colors one pastel and another more intense. xx
http://www.sakuranko.com
I want invite you to Join to my Firmoo Giveaway for win 1 pair of Glasses or Sunglasses. You choose the model!
That little ice cream topped polish looks so cute. And I love this! Definitely will try.
It's such a pretty color! :)
Super cute, I love peachy nail colors! It's so awesome for the end of summer (at least here in the States). Great post! ^__^ The Etude house polishes have the most adorable packaging too!
Congrats on winning the contest that's great! I think your nails came out great and I love the colors you used. I like the way you did the gradient with only two colors because a lot of the tutorials use 3 or more different colors. This seems easy enough to try, I don't really do nail art but I think it looks easy and it's cute too! :)
Nina
http://curvymod.blogspot.com/
thanks sis :D its easy lang i hope you can try it sometime and post pics :)
mejo rough sya pag zoom in haha but from a far its really nice. Also I think if you use colors that are close to each other for example white and silver hindi masyado halata ung rough ^^ thanks sis :)
thanks anni :)
thanks steph :)
thanks lilli :)
and i love your name! haha, thanks im glad you like the colors :)
thanks alex ^^
thank you jackie ^^
yes! i feel like eating them too haha :) they are too cute. glad you like it naaj :) thank you <3
thanks sam <3
thanks tin :)
im really glad you like it dawn :)
thanks for noticing the steps iqra haha :D im happy to know you found this post helpful ^^
this is super cute shayne! thanks for the tutorial :)
http://thebudgetfashionseeker.blogspot.com
aww thanks francesca! coming from you its an extra special compliment cause im a fan of your style :)
i did! hahaha. the same thing happened to me. i was scratching off the excess polish for a long time ^^ thanks pat :)
the etude nail polish alone reminds me of the same thing joan ^^ i wanted to make a melon shake themed nail art with it originally :D
i hope you do and post pics pls :D
hehe thanks kitty :) the only hard part was cleaning up the nails hmm it wasnt really hard it just took time ^^
the bouquet does make it look wedding themed :) but i wouldnt suggest these specific nail polish colors tho because they are too bright ^^ thank you natasja <3
thanks sherlaine <3 napa blush naman ako :D
hehe ^^ would you like to try sis? if i meet you maybe in the future i will paint your nails haha :)
thanks meg :) when you do please post pics :)
thanks too! :)
thanks vee :)
looking forward to your pics pooja :)
nice choice of words :D shouldav thought of that before i posted this entry so i can include it on the title ^^ thanks vanessa :)
thanks jiru :)
when you do pls post pics i would love to see it ^^
yus :D i would love to see that sakuranko if you make one pls post it on your blog :)
it is, it makes me want to eat it ^^ thanks maesha :)
thanks paola :)
indeed :D anna im so excited to buy acrylic paints ^^ i will definitely let you know once i do hehe :D
thank you thank you nina <3 im glad you like it. its therapeutic for me, when i feel down ipaint my nails and it makes me feel calm ^^
thank you sally ^^
Congrats! And omgosh I would've never guessed this was your first time, it looks beautiful! Your pictures are so beautifully presented too haha, followed!
X
http://rougesramblings.blogspot.co.uk/
I love the color combination :)
omg you make i look so easy!!!
thank you for the tutorial, I'll defiantly try this out one day~~~
xoxo
charmaine
charrmyn.blogspot.com
Hello cuty,
thank u very much for the Follow and comment.
Nice blog and great idea for the nails…. awwwwesomeee ^.^
P.S.: I follow u too
Kiss & Hug
Viola
Hi sweety, thanks for sharing your fashion verdict with me on my last post :)
ang cute ng color combi :)) and bet ko yung lalagyanan ng polish ng etude house. hihi :) great job on the tutorial :)) cant wait for more :DD
–thestylescraper.blogspot.com
Your nails look so GORGEOUS!!!! You make it look easy, but I'm not too sure… I always have a hard time doing my nails… should I try it?
Thank you so much for the tutorial, your really explained and showed how to do them properly.
And thank you so much for your lovely comment on my blog. About my lashes, that is the reason why I'm so afraid to use mascara… I do use an etude house serum that seems to help them grow a bit a make them stronger.
This looks really gorj and the tutorial is easy to follow (but since i have zero talent on artsyfartsy stuff, I think I might have a hard time).
Awesome post!
http://theyellowpadchronicles.blogspot.com
so pretty! the colors go really amazing together.
Bella / everythingaboutbella
Oh I love it sis! But I can never perfect this craft.:)
LOVE IT! I like the colors you used! Remind me to try this soon :D
The colors are so nice! I will try to this on my nails:}
http://outsidethewardrobe.blogspot.com/
I super like the two colors you chose! Also, the roughness other people have mentioned might be from the sponge. I see that it has many large pores. Maybe if you get a finer sponge the blended polishes will look neater :)
Next time i buy them, i will definitely remember you :P
hello darling – you have a beautiful blog!
I‘m following you and hope you can follow me back!
I invite you to my blog: cosszykownego.blogspot.com
Kisses❤❤❤❤
This ombre is so pretty! It reminds me of peaches :D
I love the colours you chose to create this look.
Looks super cute >< http://shinesque.blogspot.ca/
I don't know why, but I've never been very good at this technique. But seeing your lovely nails makes me want to give it another go. <3
hey i just want to correct, i wrote the wrong camera haha. the one im using is Nikon D5100 :D it take sharp pics :) thanks lupe <3
OMG it looks so pretty! Thanks for the tutorial <3
http://www.adekumalaputri.com
Hi Shayne! Finally got to check your blog! Congratulations for winning! <3
Wow i can't wait to try this on my nails! Thanks for this interesting and pretty pretty post!
aww thanks rouge :)
im glad you like it :)
when you do would love to see it ^^ thanks charmaine :)
thanks sienna :)
thanks sam :D
thank you roxy ^^ forever cute talaga Etude House packaging <3
thank you <3 im glad you appreciated the post ^^ what is this serum pls? :)
thanks bella :)
hehe i hope not jhanz :D i think it requires more cleaning skills haha. the painting part wasnt so hard but the cleaning part took longer ^^ thanks for dropping by jhanz :)
haha its ok sis it has a lot of room for imperfection ^^ thank you for reading <3
im glad you like it aya! thanks thanks :)
hi pepi, i would love to see the pictures when you do :)
thats actually a good idea. ill try to find one and if it does ill use it on my next try :D thanks tellie!
thanks sure :)
ooo i wish it smells like peaches too :D
thank you shin ^^
thats hard to imagine bethany ^^ you are so so good with nail arts but i would love to see you try it too :D
thanks lalaa :)
aww thanks mari for viewing my blog <3 i didn't expect it ^^ thank you :)
awww post notd pics pls :)
Cute nail polish bottle :D Thanks for this tutorial, I might try this sometime!
hi sis when you do pls post pic i wanna see it :)
wow,,thanks for the tutorial <3
i will try this with etude ice cream nails :-D
Oooh you did a fab job! I definitely need to try this soon! Thanks for the tutorial! =)
Your nails look great! And I LOVE that nail polish bottle with the ice cream cone cap. xoxo
i love those nail polishes <3 what colors do you have? thanks ehara :)
thank you chinky <3 welcome to my blog!
^^ its the cutest nail polish ive ever seen :D thank you laura :)
hi shayne!!! thanks for this tutorial. i tried to do it to my mudra's nails last night! I mentioned this in my post. check it out: http://therunnernpink.blogspot.com/2013/09/a-fashion-beauty-weekend.html
thank you for letting me know sis <3 it means a lot to me! i just checked it out <3
Gosh. I wish I could do that too. haha I cannot do my nails, frustrating!
Wow you have done a great job-they look amazing! Never realised how easily it was! I may give it a go, but I am a bit of a disaster with painting my nails so not sure how it'll go! Rachel x
http://www.pillarbox-post.blogspot.com
hahaha ^^ its easy lang sis <3
hahaha ^^ it offers room for a lot of mess :D just need some good cleaning up skills after that ^^ when you try it pls post pics so i can see too :D
Nice DIY, I suck at ombre nails haha T___T
Stars Aligned
thank you nora <3 practice makes perfect! ^^
The nails looks so pretty :-) Thanks for sharing! xx
thank you! :)